Install NetDaemon runtime
There are several ways to deploy your apps. You could just run the development project and set it up yourself. NetDaemon provides a convenient ways to run your apps:
- Using a Home Assistant add-on
- In a docker container
So let's set it up before we can deploy the apps to it.
Install NetDaemon as a Home Assistant add-on#
Two versions are provided, release and dev. If you feel you always want the latest and greatest changes you can choose the dev build but be prepare that things break!
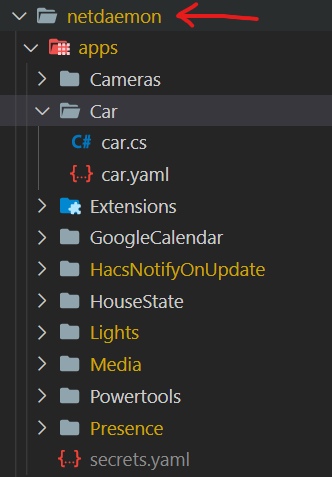
Make a folder structure under your Home Assistant configuration directory to use for NetDaemon apps.
/config/netdaemonAdd the
https://github.com/net-daemon/homeassistant-addoninAdd new repository URLto the add-on store.
Add the NetDaemon add-on.
Deploy your apps in the
/config/netdaemon/appsfolder.
Advanced add-on configurations#
The standard way running your apps in add-on is just to copy the .cs and .yaml files to /config/netdaemon/apps and it will dynamically compile and run them. If you want to use own project with custom dependecies you will have to use the advanced deployment options. Specify the AppSourcesetting in add-on config. If you set a app_source: folder, the it will dynamically compile and run apps in /config/netdaemon/folder. If app_source: daemonapp.csproj it will compile and run the project in /config/netdaemon/daemonapp.csproj with all it's dependencies. Set the app_source: daemonapp.dll it will run the published project in /config/netdaemon/daemonapp.dll.
There is not way to include other dependecies in standard dynamically compiled option You will have to run the two other advanced option to include for example a external nuget package.
Install as a docker container#
If you are using Home Assistant Core and not have the possiblity to run add-ons using the docker container is a convenient way to run NetDaemon apps.
Always use specific versioning tags of docker containers (not latest or dev) cause these are constantly getting new versions and things could break You can always find the latest stable version here
Example docker run configuration#
-p 1337:1337 is only needed if you want the admin panel
Evironment variables#
The docker container needs 3 enviroment variables to run properly.
| ENV | Description |
|---|---|
HOMEASSISTANT__HOST | The host that is running Home Assistant (defaults to localhost) |
HOMEASSISTANT__PORT | The port Home Assistant is running on (default to 8123) |
HOMEASSISTANT__TOKEN | A Long Lived Acces Token(LLAT) that NetDaemon can use for the comminication with Home Assistant. |
NETDAEMON__GENERATEENTITIES | Defaults to False, set True if you want the autogenerated entities |
LOGGING__MINIMUMLEVEL | Defaults to info, values are (trace, debug, info, warning, error) |
TZ | You will need to set container time zone to make the scheduler work properly |
NETDAEMON__APPSOURCE | NETDAEMON__APPSOURCE is used to setup more advanced runtime options. If you set a folder, the deafult dynamically compiled apps should be set in this folder. If daemonapp.csproj the runtime will run that project with all it's dependencies.Set to daemonapp.dll for published project. For standard dynamically compiled projects you do not have to set this setting. |
NETDAEMON__ADMIN | Set this to false to disabled the Admin UI. |
Volumes#
| Vol | Description |
|---|---|
| /data | The volume of the netdaemon folder should be mapped to /data See how to setup the correct folder here |
Folder structure and where to map the docker volume#
The ~/netdaemon_config need to point to the netdaemon folder. See image below. The red arrow in the example configuration below points to the folder that should be mapped to the /data!